Screen Layout
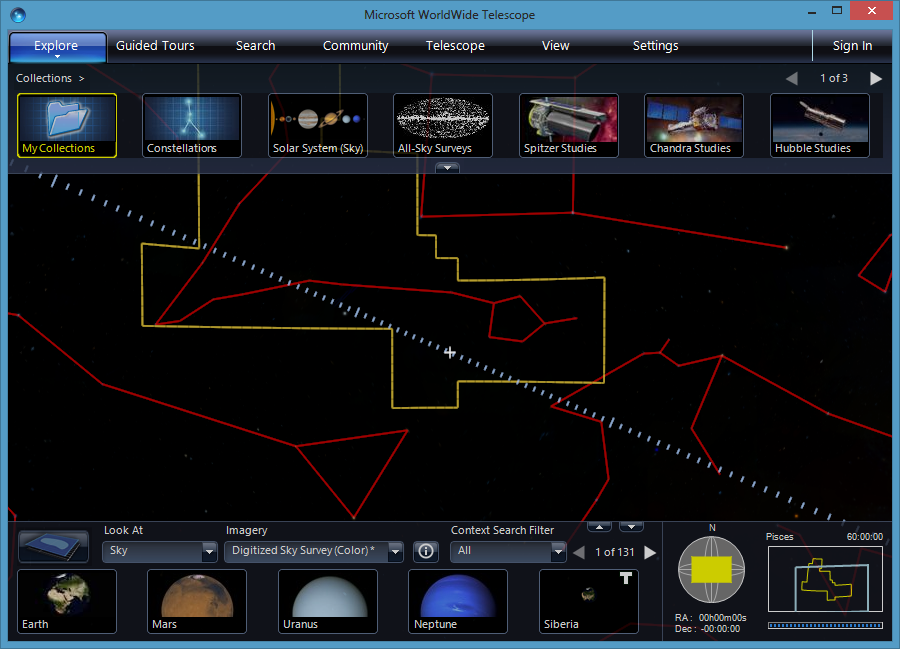
The following image shows the first view that will appear on running WorldWide Telescope. This section describes the layout, and how it changes depending on the selections of the user.
The Top Panel🔗
Along the top of the screen is the main menu, with entries Explore , Guided Tours , Search , Community , Telescope , View and Settings . These entries are described in detail later on in the documentation, however the basic purpose of each entry follows. Note that the main menu items can be clicked on themselves, which has a different function than selecting the down arrow and opening up the menu contents.
![]()
Hovering the mouse underneath the main menu item will display a down arrow. Clicking on this down arrow will open up the menu contents. Clicking on the main menu item itself (for example, clicking on the entry Explore ) will change the appearance of the top panel, and not display the menu contents.
- Explore : The first two menu items, New and Open , are used to start new data files, or open existing data files, respectively. These are the primary purposes of the Explore menu - the location of data to display. Clicking the Explore entry itself will display the data Collections thumbnails across the top panel. Selecting any of these thumbnails will either open up a new set of thumbnails to browse, or change the view to display something new. These thumbnail images either reference individual items, or another set of items (similar to a folder and file structure). A set of images are referred to as collections in WorldWide Telescope.
- Guided Tours : A tour in WorldWide Telescope is an animated, annotated slide-show, for educational, research or entertainment purposes, usually focusing on a particular topic. Clicking the Guided Tours entry itself will display the Tours supplied by default with the product in the top panel. The menu entries can be used to search for other tours on the web, and to create a new tour. Opening a tour can also be done from the Explore > Open sub-menu.
- Search : Clicking on this main menu item itself will change the top panel to show a range of search parameters, that are used to search on the default data provided with the product. Opening up the Search menu will enable some internet based searches.
- Community : A community in WorldWide Telescope is a public or private group that can be set up to share data. Clicking on the Community entry itself will display the My Communities entries in the top panel. This list will obviously be empty the first time the product is used. Select Join a Community to be linked to a website with links to public communities. Joining these communities will add them to your My Communities list, and give you a new collection of data, magazine articles, and so on, to browse and explore.
- Telescope : This menu item should only be selected if you have a physical telescope that can be connected to your computer with a USB cable and has the appropriate software interface. If you have access to such a telescope this feature enables some interesting possibilities, including using WorldWide Telescope to identify or locate objects in the sky, and perhaps to add your own images into the mix.
- View : This menu item displays options to control the observing location and time. You can set WorldWide Telescope to show you the view from any location around the globe, using the current time or a time/date in the past or future.
- Settings : Clicking on this menu item itself will display a range of settings, these are somewhat similar to the View settings, controlling what is displayed.
The Top Panel is shown in the image below. It is a glass panel that displays a range of thumbnail images. Thumbnail images are there to be clicked on, with the underlying text helping identity the data.
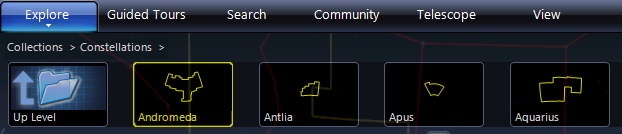
In this top panel view, the user has selected the thumbnail Constellations , so the top panel now displays all 89 constellation entries. Astronomers will note that there are 88 constellations, however WorldWide Telescope treats the divided Serpens constellation as two.
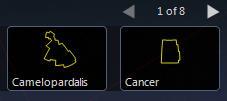
If there are more thumbnails than the top panel can display, the number of rows of thumbnails (with previous and next arrows) will appear to the far right of the panel. Select the arrows or use the mouse wheel to scroll through the options.
The View🔗
Underneath the top panel is the main view! In this case the user has selected Constellations then Cassiopeia :
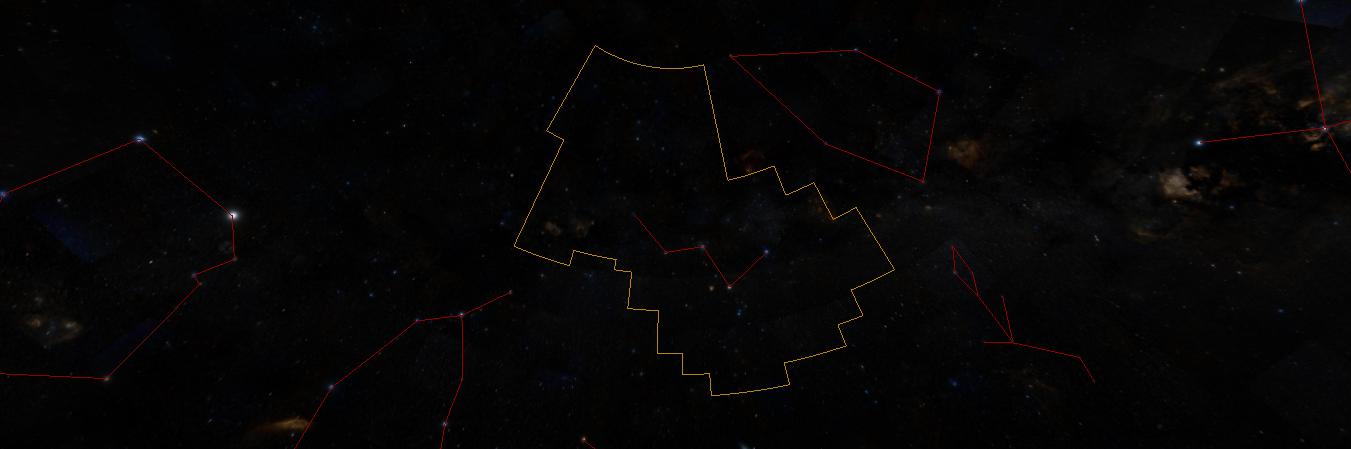
The images of the sky are annotated with the outlines of the constellations. The constellation most central to the view is referred to as the selected constellation, and is outlined in yellow. The red lines display figures — in this case linking the main stars that make up the constellation. Cassiopeia is of course known for the five bright stars making up the large W.
The View Menu and the Settings Menu have options to change what lines are drawn, and their colors. The lines shown in the image above are the default for a sky view.
To navigate the main view the primary device is the mouse. Use the mouse wheel to zoom deep into outer space, and back. Hold down the left mouse button and drag to change the angle of the view.
Clicking the right mouse button brings up the Finder Scope, which can be dragged around the screen with the mouse to help identify objects. In the image below, it has been used to select one of the stars in Cassiopeia.
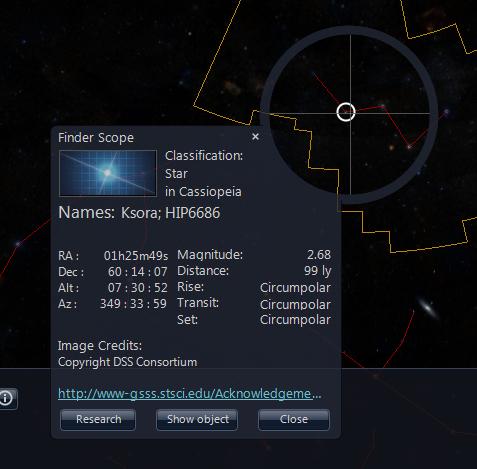
Click the X in the top right corner of the Finder Scope to close it.
The Lower Panel🔗
At the bottom of the screen there is the lower panel. This performs a variety of functions, the most significant of which are the Look At and Imagery entries.

The Look At list includes Earth, Planet, Sky, Panorama, and Solar System. This is the highest level list determining what to display. Selecting Solar System reveals the impressive 3D modeling of the Sun and Solar System planets (this is not currently available in the web control version of WorldWide Telescope). The Imagery list gives the range of data options given the selection made in the Look At list. For Solar System there is only one option. For Sky there is a large range of options, as there are many different wavelengths of light that can be recorded, in addition to the visible wavelength that we all see. Different wavelengths include x-ray, gamma, microwave, and so on. The most fascinating imagery is to most people the visible wavelength, but studies of the other wavelengths can reveal more specific information about what is happening, or has happened, to the stellar object.
Panorama is an interesting and slightly different selection. The range of imagery for this includes the pictures taken from different landing vehicles on the Moon and Mars. Selecting Earth gives the chance to examine our own planet closely, right down to streets and small geographic features.
The selections made in the Look At and Imagery lists greatly affects the relevance of other options (the View and Settings entries, for example), which are explained in detail later on in this guide.
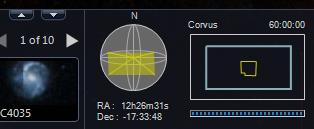
Underneath these two list entries in the lower panel is the context list of thumbnails. A Context Search is carried out whenever the view is changed, and provides a thumbnail list of all the objects of interest in the current view. The more you zoom in, the shorter and shorter this list will become. For example, select Explore then Constellations then click on Corvus . The context list is shown in the image below:

There are a lot of entries in the list, starting with the planet Saturn. This list does not only include the stellar objects in the constellation Corvus, but all those objects in the current view. They are sorted in order. The first items are the planets and named objects, the later ones often do not have a name other than their catalog entries — NGC4024 for example. If this list is long, which it often is, use the previous and next arrows to scroll through it. Notice too that the context list is populated when a view comes to a halt, it is often empty when the view is animating from one location to the next. The size of the contexts lists can be reduced by de-selecting items in the Context Search Filter.
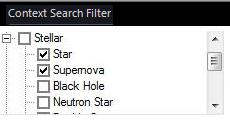
Only stars and supernova will now appear in the context list — no black holes or neutron stars!
The final elements of the lower panel are shown in the image below:
The small up and down arrows can be used to show and hide the lower panel itself.
The pane to the far right of the lower panel shows the skyball (displaying the field of view relative to the celestial sphere), and the selected constellation. This pane also shows the parameters of the view — the right ascension, declination and field of view in degrees (60:00:00 in this example).
You can drag the yellow rectangle around in the skyball to change the view. Click on the selected constellation to center the field of view on that constellation.
Right ascension and declination are a well known space co-ordinate system for astronomers, but to newcomers to astronomy probably the best way to view them is as space longitude and latitude respectively. The field of view angle is at a maximum of 60 degrees, which gives a wide angle view of the sky. Zooming in can narrow this to a tiny percentage of one degree.
The Layer Manager🔗
You can use the Layer Manager to specify which layers and overlays to display, as well as a number of other view-specific settings.
To Display the Layer Manager
- Click View > Show Layer Manager , or
- Click the Layer Manager icon.

To Add a Layer
- Click Explore > Open > Layers , or
- Right-click a Layer Manager node, then click Add .
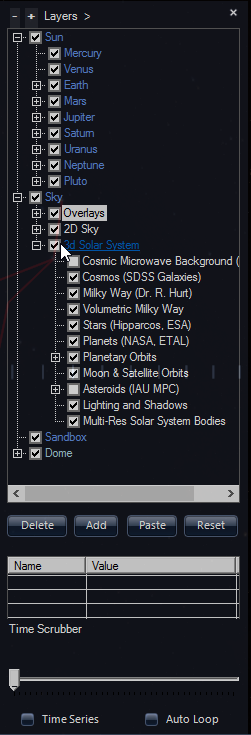
Layer Manager Nodes🔗
Each view has its own node within the Layer Manager.
- The Sun node lets you choose which planetary bodies and 3D models will be visible in the 3D Solar System view. You can toggle the visibility of the planets themselves, the moons of a planet, and any 3D models associated with the planet (such as the ISS model under Earth ). Earth also includes several overlays for clouds, elevation of geographic features, and 3D cities.
- The Sky node applies to both Sky and 3D Solar System views. Here you can toggle overlays for constellation figures and boundaries, coordinate system grids, and planetary orbits. You can also select background imagery (such as the Milky Way) for the 3D Solar System view.
- The Sandbox node lets you add custom content to view in Sandbox mode.
- The Dome node exposes options for using WorldWide Telescope with a planetarium dome.
This completes the overview of the screen layout. The following sections go into much more detail on each individual topic.