Web-based Tour Authoring
While you are exploring the universe you can create tours that capture your exploration and share them easily with your friends. This can all be done easily in the new and improved web client. The new web client is built upon WebGL which enables desktop-like performance and graphics functionality from within a web browser. Web-based tours use Slides, which are similar to those in PowerPoint. Tours authored in the Web Client can be played back on any device that support WebGL, including smart phones, tablets and PCs with any operating system. The tours can also be loaded into the Windows Desktop client used in planetariums or other complex visualization facilities.
Creating Your First Web-Based Tour🔗
- Start by opening the WWT web client. Although you can play the tour you create on the web on small mobile devices, you probably want a desktop or laptop with a mouse (with left, right buttons and scroll wheel) or modern track pad (with similar gestures).
- Throughout this tutorial, we will have you change initial views which
require you to navigate the view.
- The left-mouse click and drag – moves the camera’s view of the sky.
- Control-left-mouse click and drag – rotates the view around the center point.
- When editing at tour, the right-mouse click on an object brings up a context menu where you can select items like “Properties”. When not editing, the right click brings up a finder scope where you can find more information about an object.
- Scroll wheel zooms in-and-out.
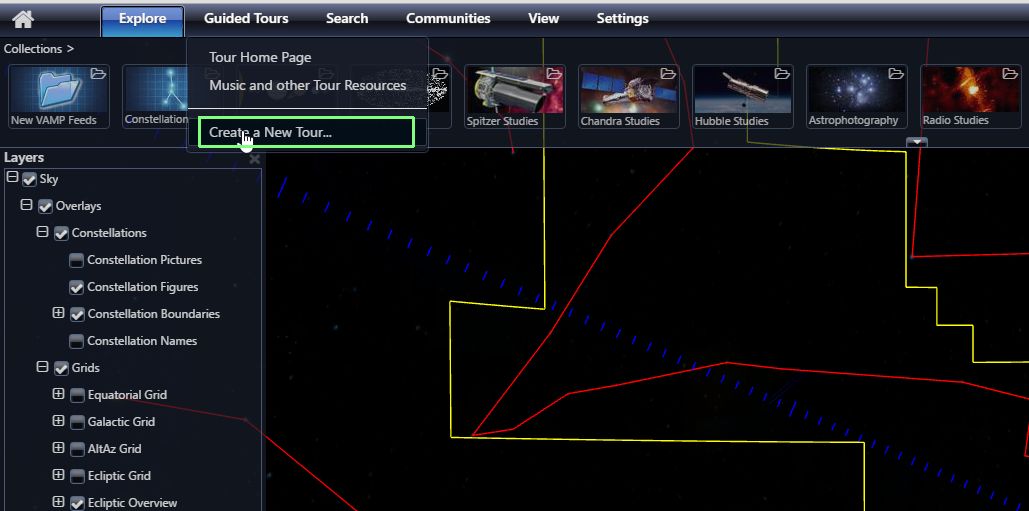
- Now, let’s actually build the tour. Under the “Guided Tours” tab at the
top, select “Create New Tour”. This will create a tab entitled “New Tour”
to the right of “Setting” tab.
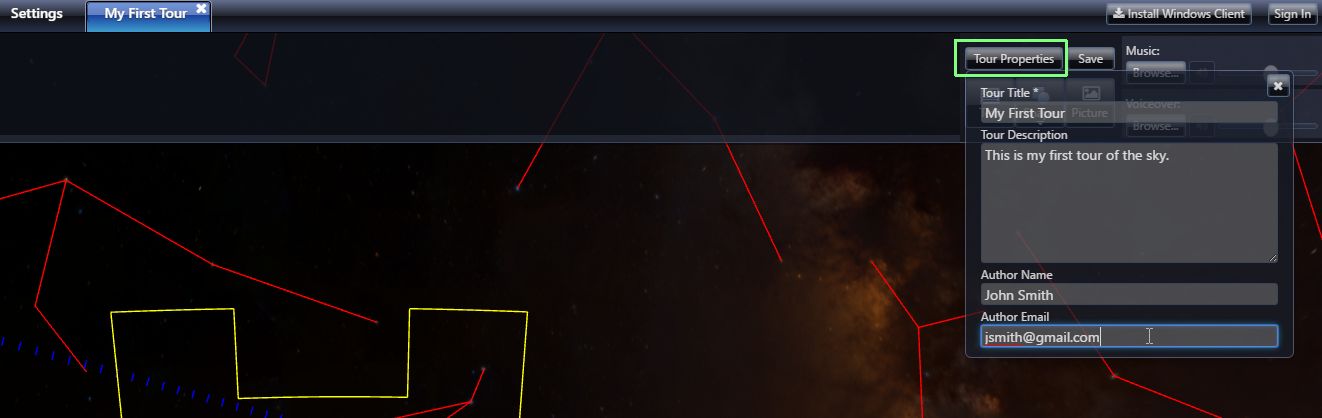
- Let’s now bring up a Tour Properties box. You must provide a Tour Title,
but all other fields are optional. The Tour Title also changes the title of
the tour in the menu bar at the top. Here you can see the tile in both
palaces is “My First Tour”.
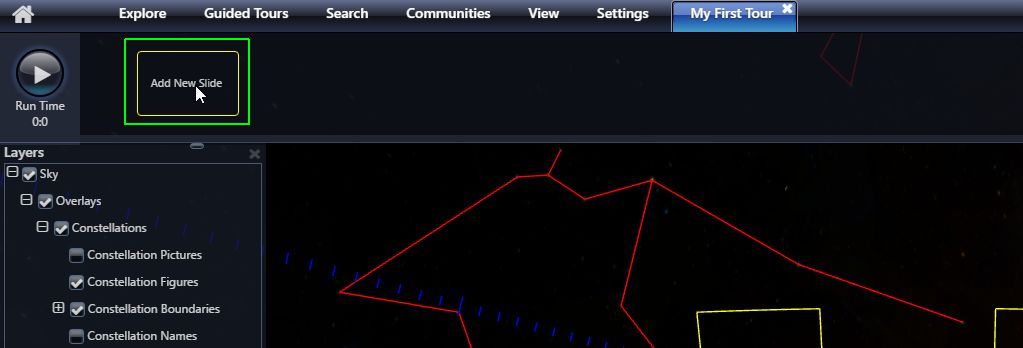
- Let’s setup the initial view for the Tour. For this tour we will be
creating a tour of the Sky. It is the default but make sure that Sky is
selected in the Look At menu in the lower left. Move the screen around
until you have a view of the sky you like and then click “Add New Slide”
button in the slide bar at the top.
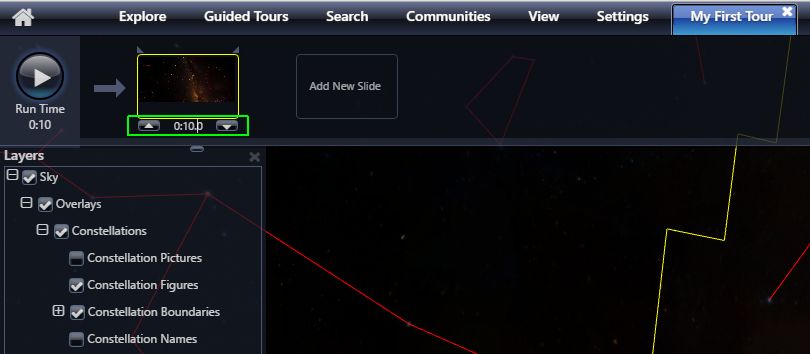
- This will create your fist slide and capture a thumbnail image for it from
the current view. It will also setup a default duration for the slide,
which is 10 seconds. You can adjust this by clicking in the time field and
directly typing the time or using the little up and down arrows on either
side of the time.
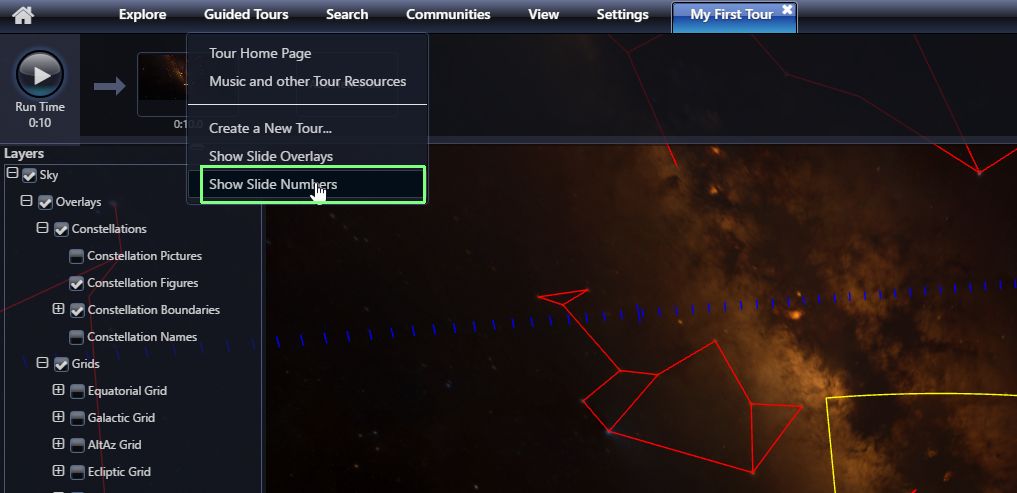
- It is useful to show slide numbers to keep track of where you are. Do to
that under “Guided Tours” tab select “Show Slide Numbers. This will put a
numeric slide number at the top of each slide.
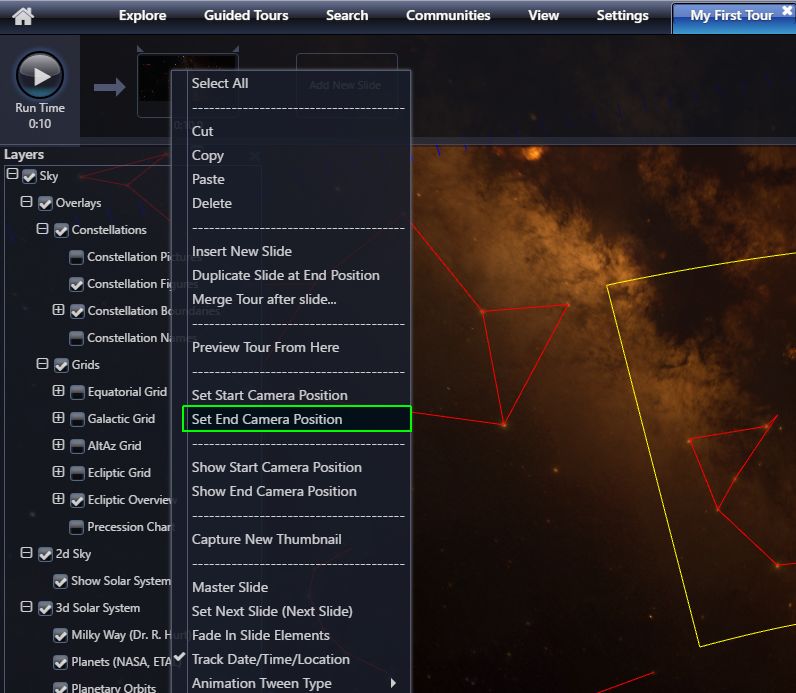
- You now have a slide with an initial view. You now should set an ending
viewpoint for the slide. When you play the tour the viewpoint will smoothly
change between the beginning and ending camera positions. To set the end
slide position, change the view, using the mouse controls explained in item
2 above. Then right-click on the slide and select “Set End Camera
Position.” Note, there is a yellow ear on the top left of the slide when
you are looking at the start position and on the right hand part of the
slide when looking at the end camera position.
- Now you have a 10-second tour consisting of one slide. Go ahead and press the Play button to see how it works.
- When the tour is finished playing, click “Add New Slide” again. This will add a second slide using the end camera position as the starting position for the new slide. If a sequence of slides is intended to show contiguous motion, you should make sure that the end camera position of one slide is the same as the beginning camera position of the next one.
- You can continue these steps to create a sequence of slides.
- Between every two slides there are various transition options, shown
below. Note that some transitions take time which is taken out of the
start time for the second slide (Slide B). Note that the transitions can
be thought of as being added on top of camera motion defined by the
slides.
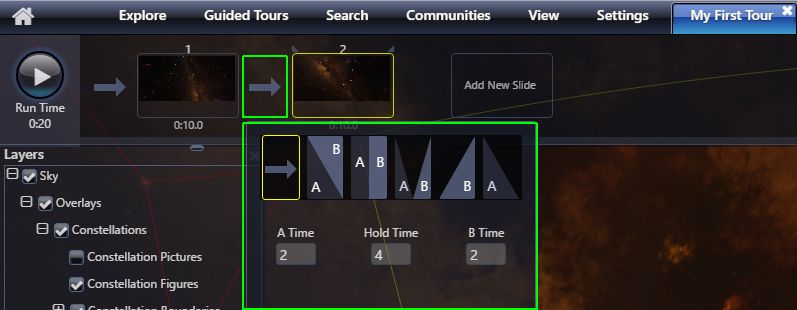
- The default arrow means that the slide moves from the end of one slide to the next without pause. This is used for contiguous motion.
- The
A\Btransition is a cross-fade between two viewpoints. - The
A|Btransition is a hard cut between two viewpoints. - The
A\/Btransition is one that fades through black between two viewpoints. - The
/Btransition is a hard cut from A to black and then fades in B - The
A\transition fades out to black and then does a hard cut to B.
- At the upper right-hand side is an interface that allows you to add
overlay elements to slides: Text, Shapes and Pictures.

- Clicking “Text” shows a text dialog box where you can enter text, select font and font-size, foreground color, background color, style (bold, italics, underline), text and background colors.
- You can add built-in shapes, such as circle, rectangle etc.
- Finally, you can add pictures. Clicking this opens a dialog box where you can browse for local images to add.
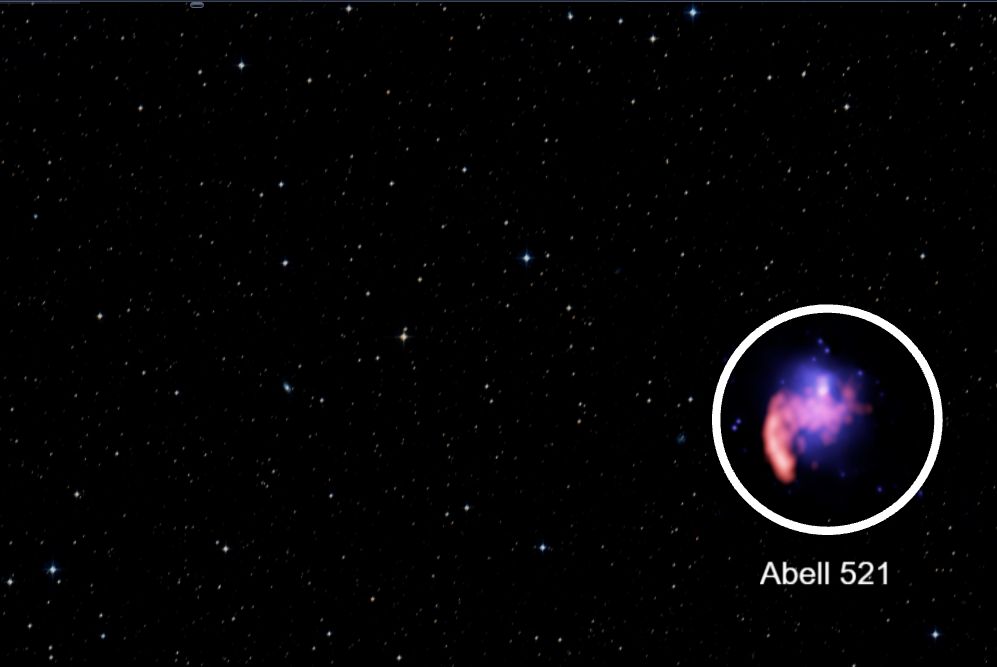
- By default, all objects that are added stay in the same place on the
screen throughout the slide. However, once added, you can right-click
on an object and click “Animate.” This enables you to specify how the
object should look at the beginning and also the end of the slide. Once
an object is animated, you can right click on the slide and “Show Start
Camera Position” and then change the location, size etc. of the object
and the right-click and “Set Start Camera Position.” You can do this
again for the end positions changing the end characteristics of
animated objects. You can also turn off animation. It will default to
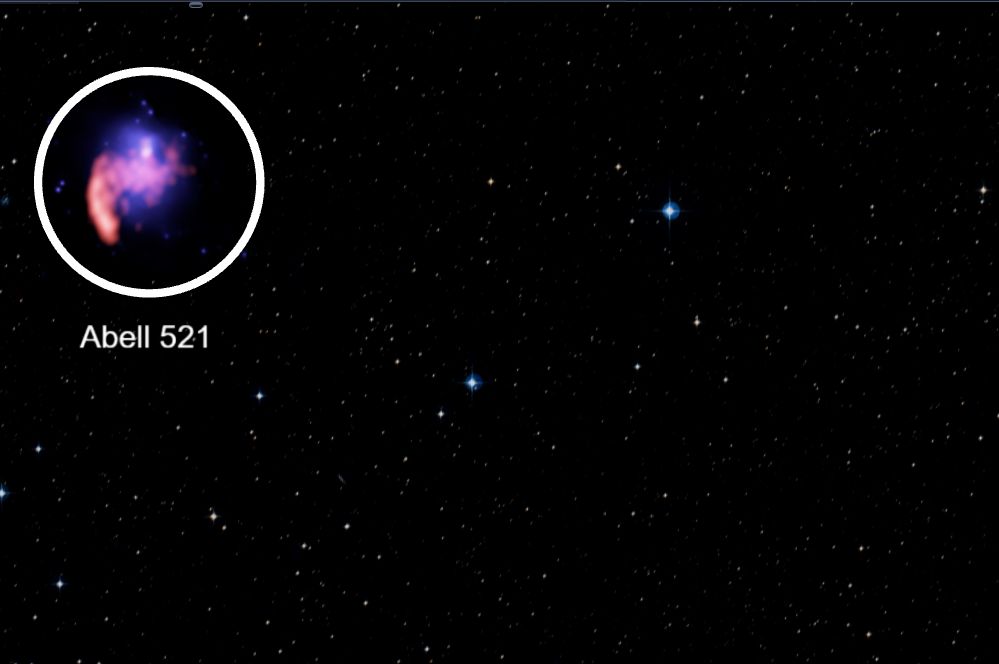
whatever slide position is showing (Start or End). For instance, the
example below shows the galaxy cluster Abell 521. A ring and text label
have been added to identify the object, which is at the upper left at
the Slide Start position. The camera was moved such that the object was
in the lower right at the Slide End. The text and ring overlay objects
were animated (right-click, select “Animate”). They were positioned
over the object at the slide start and moved to where the object was at
the slide end. Below are screenshots of the slide start and end. When
you play the slide the object and text move smoothly from start to end.
- If you have a long tour it is time-consuming to watch the entire tour to see the effect of a change near the end. You can right-click in any slide and select “Preview Tour From Here” and the tour will play from that location.
- You can add an audio soundtrack (Music and/or Voiceover). The files must
be MP3. The volume of each audio file is controlled by a slider and are
mixed together during playback. Each slide can have its own audio tracks.
This is helpful when you change the timing of a slide you don’t have to
re-record the entire narration. Audio will end at the end of the slide
unless slide is a master slide (see below)

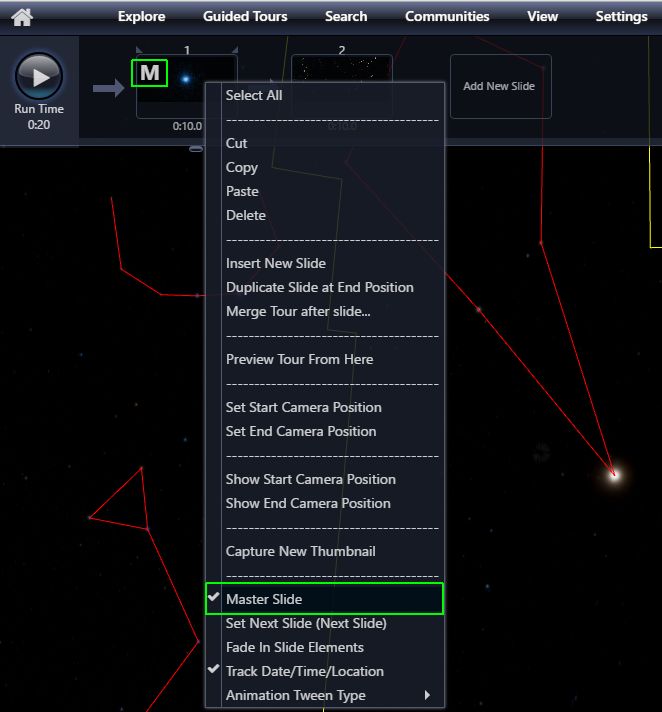
- There is special type of slide called a Master Slide. You make a slide a
Master slide by right-clicking and selecting “Master Slide.” Overlay
elements (Text, Shapes and Pictures) remain on all subsequent slides until
another Maser Slide is encountered. This also affects audio. Audio on a
master slide continues to play through subsequent slides. Per-slide audio
can be added on slides after the master slide and both audio tracks will
be mixed. Objects on a master slide (Text, Shape, Picture and Audio)
remain until the tour ends or encounters another Master Slide.
- You can reorder the slides by clicking a slide and moving it to a new location in the slide set. You can select multiple slides by holding down Control while clicking on slides; selected slides will be outlines in yellow.
- When you are want to save the tour, you can click the Save button in the
upper right. Currently, saving the file saves a local .wtt file in your
Downloads folder.

How is Web-based Authoring Different from Authoring with the Windows Desktop Client?🔗
For those familiar with the Windows Desktop Client, it is instructive to show how the Web Client differs from the Desktop one.
- No Timeline-based tours that have Keyframes.
- Audio Files must be MP3.
- The Web Client cannot be used in a dome or cluster installation.
- The Web Client cannot render to video.
- No VR capability.