Using the Timeline Editor
Slide-based tours have only a start and end position and WWT smoothly moves between them. However, you may need finer control to change views, location and appearance of objects in a more flexible fashion. To do this, you can edit the timeline control for each slide of a tour.
Important: Tours built using timelines can only be played back on WWT 5.0 or later.
Tutorial Video🔗
Creating Tours with the Timeline Editor🔗
To create a tour using timelines, do the following:
- Create a new tour: Guided Tours and then click Create a New Tour...
- Set Look At mode and the orient initial view for the Tour.
- Create an initial slide by clicking Add New Slide.
- Right-click on this slide and select Create Timeline. This will display a timeline window at the bottom of screen. The buttons outlined allow you to adjust the size of the window as well as unpin it from the main window.
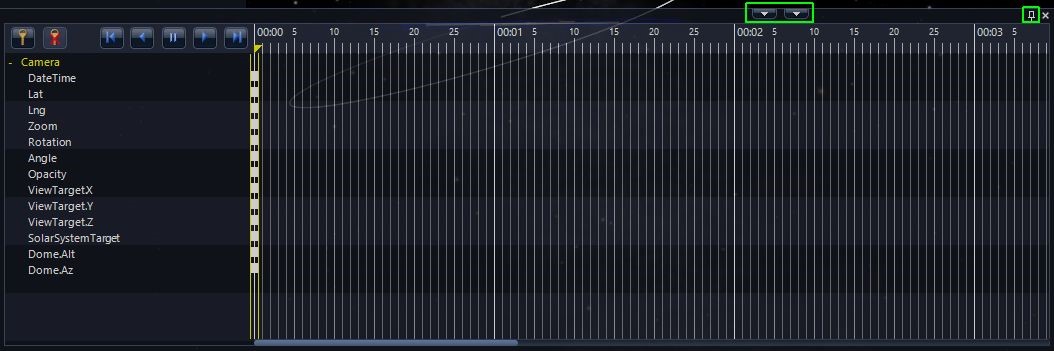
The timeline editor shows objects and settings on the left. Initially, there
will be a single element on the left called Camera. The + symbol to the
left will open a list of attributes you can control. There are transport
controls which take you to the beginning or end of the timeline as well as
playing forward or backward. The time is shown across the top of the remainder
of the frame. Time is shown in MM:SS along with frame numbers – 30 frames per
second. Objects can be controlled down to one frame = 1/30 of a second. While
over the timeline you can use the scroll wheel on your mouse to change the
scale of the timeline and to scroll the view of the timeline left and right.
You can grab the yellow triangle which adjusts the current time. This is
useful to get from one point to another and to see motion in the main window.
Note: The one aspect of the view that cannot currently be controlled by the timeline is the "Look At" mode. This must be set once for the entire slide.
Example🔗
For this example we will Look At the Solar System. A one-slide tour showing this example is available here.
Adding objects🔗
You can right click and select Add to Timeline on most of the objects in the Layer Control Manager on the left hand side of the screen. For some planetarium productions, the constellations might need to be turned on at some point and then fade out. You can add separately control Constellation Pictures, Figures, Boundaries and Names. In this example, I will add constellation figures and planetary orbits, both with labels.
- In the Layer Manager, under Sky > Overlays > Constellations, make sure that the Constellation Figures is checked and then right-click and select Add to Timeline. This will create an object called ConstellationFigures in the timeline.
- Also in the Layer Manager, under Sky > 3d Solar System, make sure that the Planetary Orbits is checked and then right-click and select Add to Timeline. This will create an object called SolarSystemOrbits in the timeline.
You can also add overlay objects such as Text, Shapes or Pictures. For this example, I’ll create two Text Objects called Our Solar System and The Sky and put them at the same location. Then I will right-click and select Add to Timeline.
Hint: Sometimes you can’t see the overlay objects because then are stacked up, underneath a menu or difficult to find in Full Dome mode. In the Guided Tours menu select Show Overlay List. A list of text, shape and image overlays is shown. You can right click on overlay objects and change the ordering, color etc. If you are going to add something to the timeline with color, you should change the color in this right-click menu rather than the text entry box. You can change the name in the Overlay List by right clicking and selecting Properties. When using the timeline editor do not select Animation, which is a slide-based way of doing a similar as timeline editing.Sometimes you can’t see the overlay objects because then are stacked up, underneath a menu or difficult to find in Full Dome mode. In the Guided Tours menu select Show Overlay List. A list of text, shape and image overlays is shown. You can right click on overlay objects and change the ordering, color etc. If you are going to add something to the timeline with color, you should change the color in this right-click menu rather than the text entry box. You can change the name in the Overlay List by right clicking and selecting Properties. When using the timeline editor do not select Animation, which is a slide-based way of doing a similar as timeline editing.
Keyframes🔗
Each object or setting in the timeline can change display attributes at specific times and WWT will smoothly move between them. These are called Keyframes and are represented in the timeline editor as small rectangles. Above the list, there is button to create (key) and delete (key with x over it) keyframes. Initially, there is a keyframe at the beginning of the timeline for every object that has been added to it.
In this example, start with a view of the sky with constellations, fade out the constellations and fade in planet orbits and end with a view of the Solar System. You can easily move keyframes in time, so start by considering the sequence and refine the timing later.
Start by expanding the timeline editor clicking the up arrow. First adjust the constellation figures to fade out from second 3 to second 5.
- Click the “+” symbols to the left of ConstellationFigures.
- Click on Opacity under ConstellationFigures.
- Move the time to 00:03.
- Click the Add Key button (looks like a key above the list).
- Move the time to 00:05.
- Make sure Opacity is still highlighted and click the Add Key button.
- Click the first key you made at 3 seconds. An editor box will show up.
If a single key is selected then the label of the key will be shown above
the field on the upper right. If key object is not expanded a keyframe will
control all attributes. Note, the time field is also shown but you cannot
change the time.
- Make sure the Opacity is set to 1.
- Edit the Opacity keyframe at time 00:05, and set it 0. Then close the window by clicking the X in the upper right.
- Do the same for the Opacity keyframe at time 00:00.
- Edit the Opacity keyframe at time 00:05, and check that it is 1.
- Do the same (steps 1–12) for the Color.Alpha attribute under the object entitled The Sky.
- Run the time scrubber back and fort hand you should see that at time 00:03-00:05 the constellations and text The Sky will fade out
- For the SolarSystemOrbits create keyframes at 00:03 and 00:05 the Opacity attributes to 0 at time 00:00 and time 00:03 and to 1 at 00:05.
- Repeat this for Color.Alpha for the text object Our Solar System.
Now when you play the tour (either with the play button in the timeline editor or the big play button to the left of the single slide of the tour), the tour plays, showing the sky rotating with constellation figures and text label The Sky shown. Then at 00:03-00:05 these elements fade out and the planetary orbits fade in with a text label Our Solar System.
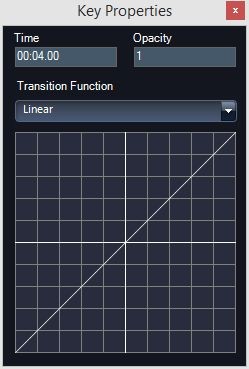
Transition Functions🔗
The keyframe editor can also allow you to select Transition Functions. These affect the way attribute changes between one keyframe and another. The transition of input and output values is shown graphically. You can select from the following choices.
- Linear – Numbers are linear changes between values
- Exponential – Changes are change faster at the begging and slow down at the end – similar to EaseIn below.
- EaseIn – Changes are change rapidly at the begging and slowly at the end.
- EaseOut – Changes are change slower at the begging and rapidly up at the end.
- EaseInOut – Changes slowly at beginning, changes rapidly in the middle and slowly at the end.
- Instant – Keeps starting value until the very end where it changes instantly to a new value.
- Custom – Allows you to change the curve interactively. Grab the yellow square handle on each end of the curve which manipulates the beginning and ending shape of the transition curve.
It is good to choose a keyframe such as camera motion and try out all the transition functions to get a sense of what they can do.
Manipulating Keyframes in The Timeline Editor🔗
Besides changing the properties of keyframes, single or multiple keyframes can be selected for deletion, copying or pasting. Selected keys are shown as yellow. There are three ways of selecting keyframes:
- Control-A – selects all keys in timeline.
- Control-click – holding down the control key and clicking multiple keys adds them to a group.
- Drag rectangle – dragging a rectangle around the keys of interested groups those keys.
Note: you cannot move the keyframes at time = 00:00 from that time, even if they are selected as part of a group.
In this example, I will move the keys from 03:00 to 04:00 to make a shorter transition. To do this:
- Show timeline editor and move it to show time 03:00 to 04:00.
- Drag a rectangle over the keys at 03:00. They should all turn from white to yellow.
- Move the selected group of keys to the right and place them at 04:00.
Adding Fade-In and Out for A Slide🔗
If you are comfortable with the timeline editor, it is better to use it to control slide Fade-In and Out. Controlling the Fade-In can be very helpful to hide data loading especially.
- Move the time slider in the timeline to the left. Find the Fade to black in the layer manager. Make sure the Fade Dome Only is not set. Check the Fade to black box.
- Right-click on Fade to black and select Add to Timeline.
- Move the time slide to 01:00. Uncheck the Fade to black box. Right-click on Fade to black and select Add keyframe.
- Move the time slider to 09:00. Right-click on Fade to black and select Add keyframe.
- Move the time slider to 10:00. Check the Fade to black box. Right-click on Fade to black and select Add keyframe.
Now when you play the slide in the timeline editor or tour player, it will fade in and out. Note that scrubbing by manually moving the time doesn’t trigger the fade to black.
Note: If you change the duration of a slide with an existing timeline, it will ask you if you want to trim/extend or scale the timeline. If you trim, be careful because you won’t have an end position for the slide. When trimming and the camera or other properties are changing, you probably want to move the time slider to just before the trim point. Then make key frames for the changing parameters. Then when you trim the timeline it retains keyframes of an end position for interpolating between values.