Construction of the Dome Support
Construction of the dome, and the dome support can largely proceed in parallel. To construct the dome support, go through the following procedure:
-
Purchase the necessary materials:
- 5 sheets of particleboard, or plywood, 96 inches by 48 inches.
- 17 feet of 2 x 3 inch wood.
- 20 feet of 2 x 2 inch wood.
- 120 wood screws (1 or 1.25 inch).
- 20 heavy duty clips to attach the dome to the support.
- 10 lengths of 1 x 1.5 inch wood, each piece exactly 48 inches long.
- Two hinges and one handle per door.
- Black 2 inch wide tape.
-
Assemble the necessary tools:
- Miter saw, or compound miter saw.
- Portable circular saw.
- Hand saw.
- Safety goggles and masks.
- Sandpaper.
- Drill.
- Matt black paint.
- Chalk line, or long measuring rulers.
- Other tools may be helpful: files, screwdrivers, planes, clamps, saw horses, and so on.
-
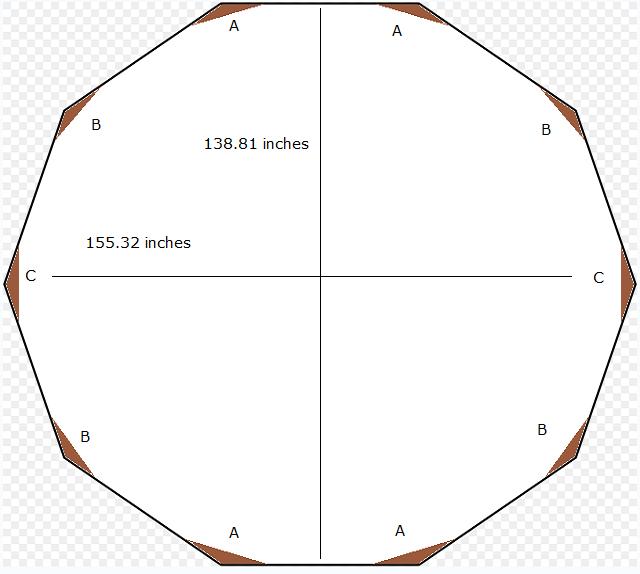
Understand the shapes involved. Both the dome and dome support are based on a decagon - 10 sided figure - shown in the following diagram:
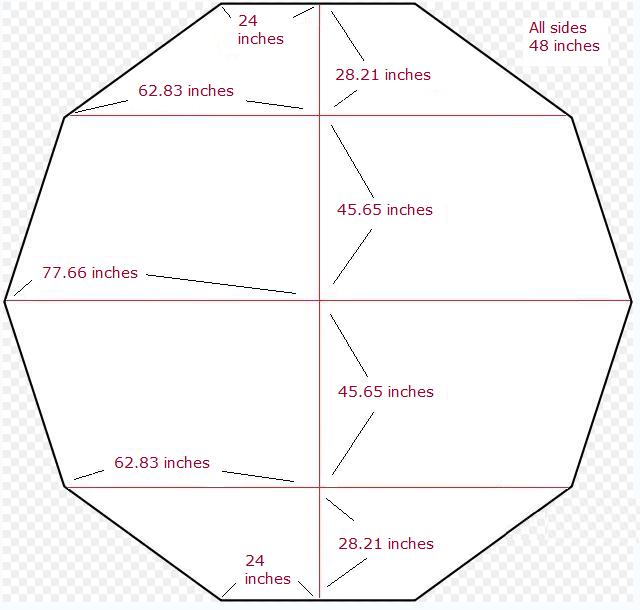 The dome is a decagon - each
side is 48 inches.
The dome is a decagon - each
side is 48 inches.Each inside angle is 144 degrees.
The front to back diameter is 147.72 inches. The side to side diameter is 155.32 inches.
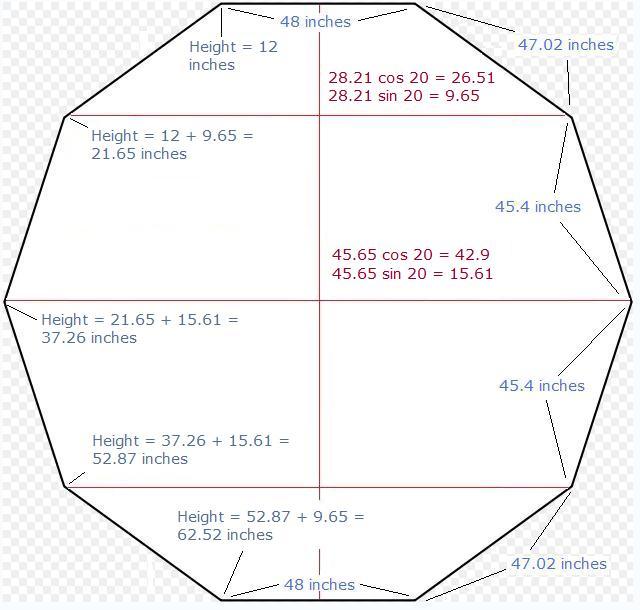
After tilting 20 degrees the plan view of the support becomes an elliptical, rather than regular, decagon. The top edge of each panel is 48 inches, but the widths of the other panels vary - 48 inches for the rectangular panels. but 47.02 inches and 45.4 inches for the angled panels.
The dome support profile.
-
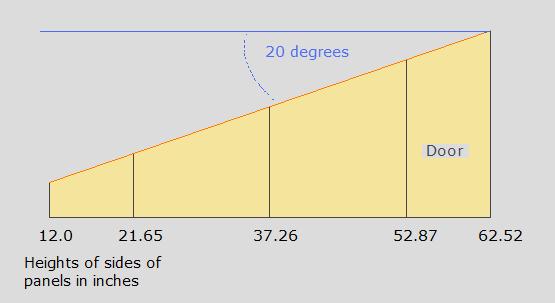
Cut out, or have cut out for you, the 10 side panels in 0.5 inch particleboard or plywood. The 10 panels are:
- 1 at 48 inch by 12 inch rectangle.
- 2 at 47 inch base, with one side at 12 inches and one at 21 5/8 inches.
- 2 at 45 3/8 inch base, with one side at 21 5/8 inches and one at 37 1/4 inches.
- 2 at 45 3/8 inch base, with one side at 37 1/4 inches and one at 52 7/8 inches.
- 2 at 47 inch base, with one side at 52 7/8 and one at 62 1/2 inches.
- 1 at 48 inch by 62 1/2 inch rectangle.
-
Lightly sand and smooth the edges of the wood.
-
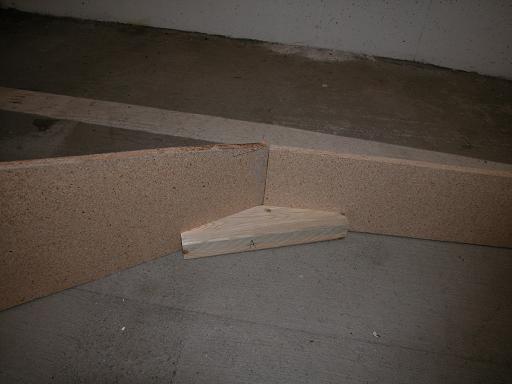
Cut out 20 wooden connecting blocks for the panels, from 2 x 3 (or similar) wood. Because of the tilt, the blocks are not all exactly the same size. The thickness of the wood is not that important - it is the angles that are critical. The more accurate you can cut the angles the less adjustment will be necessary when the dome support is matched to the dome. Most miter saws will not cut at such an acute angle as 17 degrees, so first make a template block with a cut at 73 degrees using a miter saw, then to cut the 17 degree angle clamp the template block in place, carefully place the actual block, and then a 90 degree cut will give the desired result. Note that the two cuts on each block need not meet at an exact point, though they can. A short flat section between the two angled cuts is not a problem. With a simple 10 inch miter saw block widths should be chosen that the saw can cut right through - which limits the thickness to 2.5 inches or so. A compound miter saw will give greater flexibility. Before starting on the angled cuts, cut the 2 x 3 wood into 10 inch lengths (20 are needed).
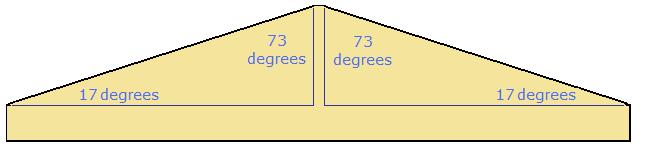
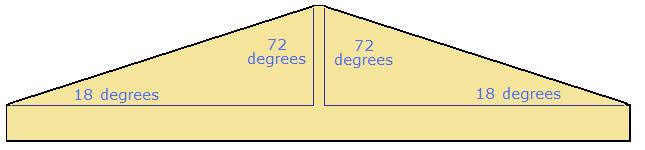
Block A. Eight of these are needed. After cutting them out mark them with an "A", as the angles of all blocks are very similar.
The exact angles here are 72.85 and 17.15 degrees.
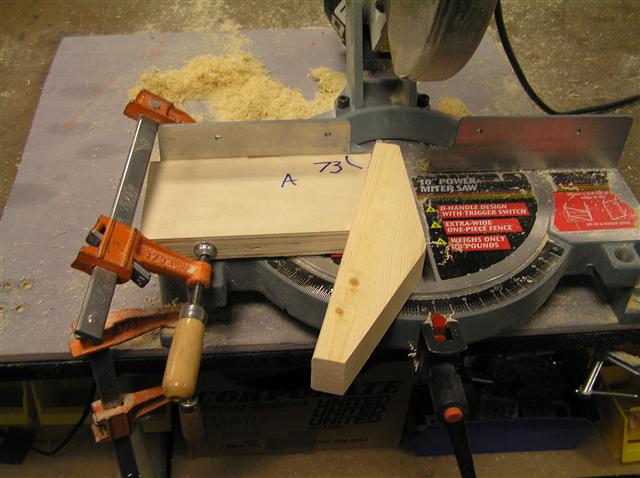
Note the 73 degree template block has been marked and clamped to the miter saw.
Block B. Eight of these are needed. Mark these with a "B".
The exact angles here are 71.7 and 18.3 degrees.
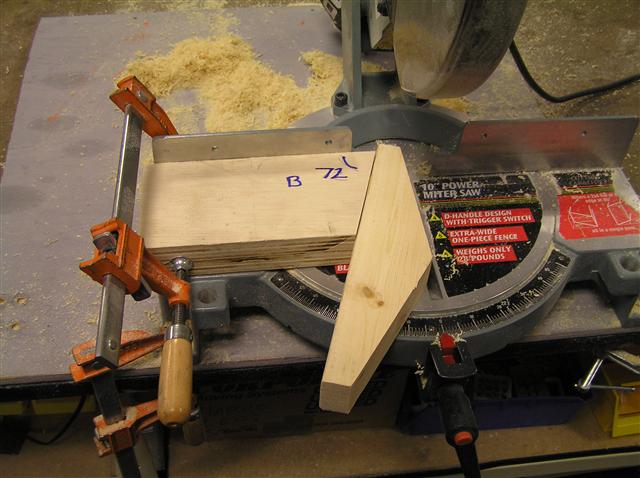
Make a 72 degree template block to start with. Then cut out eight B blocks.
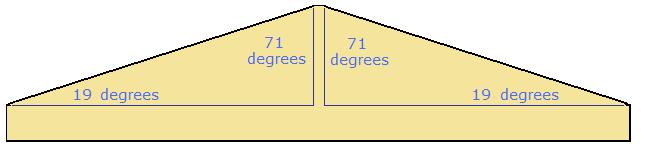
Block C. Only four of these are needed. Mark them with a "C".
The exact angles here are 70.9 and 19.1 degrees.
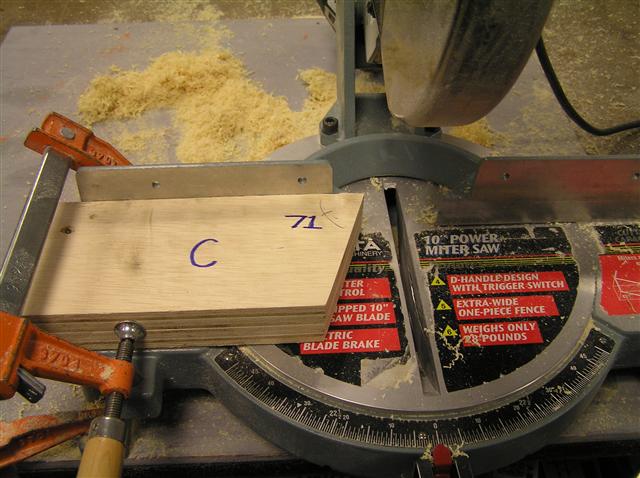
Make a 71 degree template block to start with. Then cut out four C blocks.
-
Take one of the panels marked "Door" in the preceding images. Cut out a rectangular door shape, and fit hinges and a handle on the outside. The door will open to the outside, so there is no need for a handle on the inside.
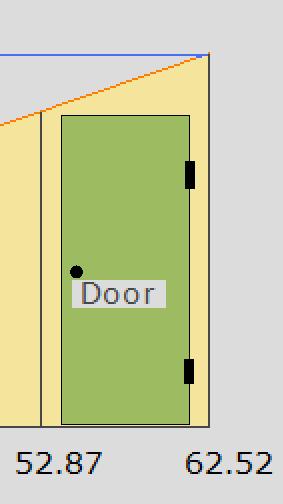
The door height will be more suitable for children than for adults.
If a larger door is required consider adding an equal amount to the heights of all the side panels.
In order to have a full size door the whole structure can be raised by making the lower side of the dome support higher than 12 inches. However, to have a 6 foot door the lower side will need to be around 36 inches, adding a further 2 feet to the height of the planetarium.
Add a second door to the other side of the dome support - to provide both an "In" and an "Out", and a fire escape.
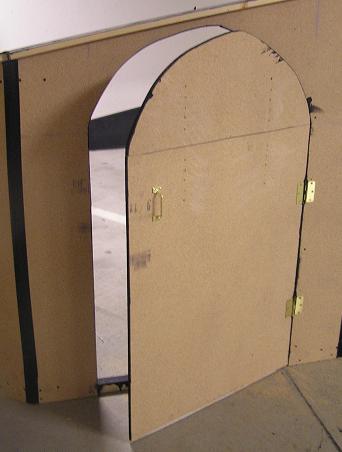
Note the 2 x 2 inch wood used to strengthen both the side of the door frame containing the hinges, and across the bottom of the door opening. Use scraps of wood to strengthen the hinges on the door itself.
For a rectangular door, consider using a powered circular saw to cut out most of the door, but use a hand saw to finish off the cuts. For the rounded door shown in the picture, use a hand held jigsaw to cut out the shape, after carefully drawing the arc on the panel.
The rectangular door shown in some of the images is quite short - due to height restrictions in the assembly area for the prototype - which is the reason why the rounded door was made as an improvement to make a little more headroom.
-
Using short screws (1.5 inch wood screws, or similar) assemble the dome support by screwing one block low down on each panel, and one near but not at the top (at least 1 inch short of the top of the shortest of the two panels). Pilot holes for the screws should be drilled first, and the screws drilled into place but not tightened to the max until the whole support is in place.
Note the positions of the A, B and C blocks, and that there are two of them per joint.
A plan view of the dome support shows it to be an elliptical decagon.
The first block. Use an A block to connect the shortest rectangular panel with the shortest angled panel.
Next add the second block to this joint.
Then add the matching shortest angled panel to the other side.
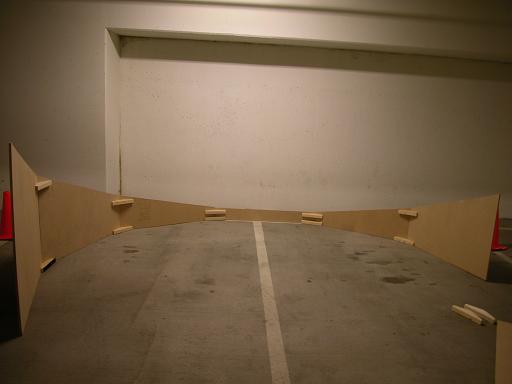
The progression. Moving left and right assemble the dome support panels from the shortest towards the tallest panel.
Unevenness in the floor might cause some minor alignment issues. If this is the final location of the dome, then ensure that it is as stable as it can be. Minor mismatches in the heights of the panels is dealt with when screwing in the ledges.
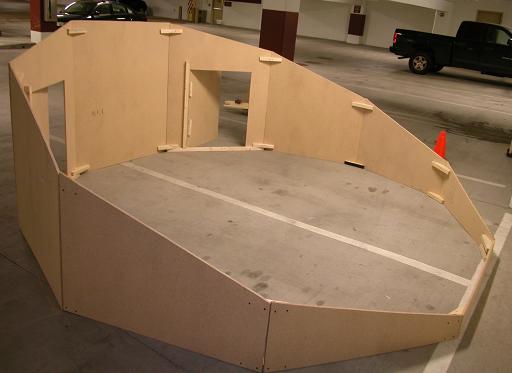
Note the positions of the top joint blocks a few inches below the rim.
-
On the outside of the top edge of each panel screw in a length of 1x1.5 inch wood (or similar) that is exactly 48 inches long. This should create a ledge all the way round the outside of the dome support. Accurately align the ledge with the top of the panels, but more importantly with the preceding ledges, so that the supporting surface for the dome does not change height from the end of one side panel to the start of the next. Start at the tall rectangular panel, and using 3 screws per ledge, carefully work your way around the dome support.
-
Using a 2 inch diameter hole drilling bit (or similar) - drill out a grid of 3 x 4 or 4 x 4 holes to be used to vent the planetarium.
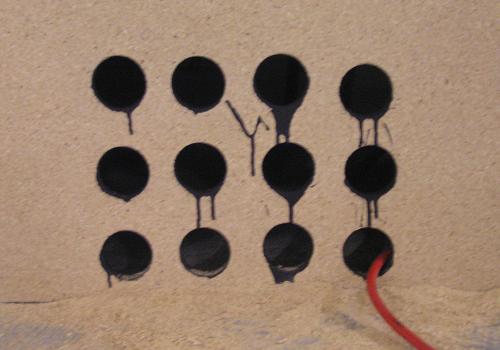
A small extractor fan will be added to the dome support at a later stage, to provide some airflow.
-
Clean the dome support area of all sawdust, screws, and any left over pieces of wood.
-
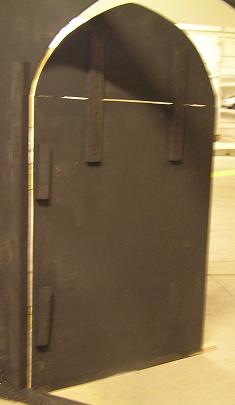
Paint the inside of the dome support a flat matt black.

Make sure to paint around all the blocks, the door supports, and the top of the ledges. Also paint the insides of the vent holes, and the edges of the doors. Try to paint to the bottom of each panel without painting too much of the floor! Use plastic tarps, or similar, to protect the flooring if necessary.
-
Paint the outside of the dome any color you like.
-
Seal all the gaps on the outside. No light should get in through the joints between the panels, nor around the sides of the door. Use a thick tape to seal the joints. The door is more complicated, consider attaching a black felt curtain on the inside to block out any light.
To Construct a Smaller Dome Support🔗
To construct a dome support using 36 inch, rather than 48 inch, sides, use the following table of measurements for the panel sizes. This will create a dome support for a dome that is just over 9 feet in diameter. The dome support will have a side to side diameter of 116.5 inches (about 9.5 feet) and a front to back diameter of 104.1 inches. Obviously use 36 inch long ledge sections, but the blocks that fit the dome support together have exactly the same angles as for the 48 inch sided dome support. Note that the door for entry will now be quite short, so consider adding 12 inches to the height of all the panels, if your location has the headroom!
| Number | Sizes |
|---|---|
| 1 | 36 inch x 12 inch rectangle. |
| 2 | 35 1/4 inch base, one side 12 inches, other side is 19 1/4 inches. |
| 2 | 34 inch base, one side is 19 1/4 inches, other side is 30 15/16 inches. |
| 2 | 34 inch base, one side is 30 15/16 inches, other side is 42 11/16 inches. |
| 2 | 35.26 inch base, one side is 42 11/16 inches, other side is 49 7/8 inches. |
| 1 | 36 inch x 49 7/8 inch rectangle. |
The Dome Specification Utility🔗
Click on the link below to run a utility program that will calculate the triangle and panel sizes required, given three inputs:
- The length of the sides of the equilateral triangles (triangle A).
- The height of the shortest panel in the dome support.
- The tilt angle in degrees. Though 20 degrees is recommended, other angles can be used, and the software can be configured to match.
Note that the utility requires scripts to be run, so if you get a security warning, be sure to Allow Blocked Content. Note also that angles do not change with the size of the dome.