Samples
There are several sample applications provided with the SDK that demonstrate how to use the APIs. Each of these samples deals with a different type of dataset and produces a single collection that can be viewed in Worldwide Telescope.
- BlueMarbleApp: This sample demonstrates how a single image in Equirectangular projection or set of images in Equirectangular projection can be transformed to Toast or Mercator projection image pyramids that can be visualized in WorldWide Telescope.
- SpecificRegionDataSet: This sample demonstrates how an Equirectangular dataset in XYZ format, for a specific region of the world can be transformed to Toast or Mercator projection image pyramids that can be visualized in WorldWide Telescope. This sample also supports the Digital Elevation Model (DEM). A digital elevation model is a digital representation of ground surface topography or terrain. DEMs are used often in geographic information systems and are the most common basis for digitally-produced relief maps. This sample needs the Sharing Service application to be set up. The data needs to be comma separated containing longitude, latitude and depth values.
- WorldDataSet: This sample demonstrates how a data set in XYZ format, for the entire world can be transformed to Toast or Mercator projection image pyramids that can be visualized in WorldWide Telescope. The data needs to be comma separated containing longitude, latitude and depth values.
- Sharing Service: This sample demonstrates how a web application can be set up to serve both images and DEM tiles to WWT, and Community data. It provides a means for users to share their collections with others, by accessing pyramids via URL rather than a local folder path. A Bing Maps integration sample source code in the Sharing Service folder explains how to have the tile pyramid created by this SDK displayed in Bing Maps (this works for Mercator projection only).
This document provides instructions on how to run these samples to generate the image tile pyramid along with the WTML collection file that can be visualized in WWT.
Prerequisites🔗
To run the samples ensure your system meets the hardware requirements and the necessary software is installed.
To Install IIS 7.5 on Windows 7🔗
You can perform this procedure using the user interface (UI) or a script.
Using the UI🔗
- Click
Startand then clickControl Panel. - In Control Panel, click
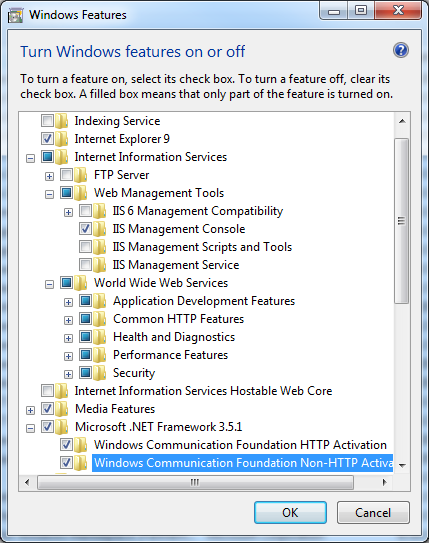
Programsand then clickTurn Windows features on or off. - In the Windows Features dialog box, click
Internet Information Servicesand then clickOK.
Installing IIS on Windows Server 2008 and R2🔗
https://technet.microsoft.com/en-us/library/cc771209.aspx
When you install IIS, it is preconfigured to serve as a default Web site; however, you may want to change some of the settings. To change the basic settings for the Web site and to emulate the steps that are required to set up Apache for the first time by using the configuration file:
- Log on to the Web server computer as an administrator.
- Click
Start, point toSettings, and then clickControl Panel. - Double-click
Administrative Tools, and then double-clickInternet Services Manager. - Right-click the Web site that you want to configure in the left pane, and
then click
Properties. - Click the
Web sitetab. - Type a description for the Web site in the
Descriptionbox. - Type the Internet Protocol (IP) address to use for the Web site or leave
the
All (Unassigned)default setting. - Modify the Transmission Control Protocol (TCP) port as appropriate.
- Click the
Home Directorytab. - To use a folder on the local computer, click
A directory on this computer, and then clickBrowseto locate the folder that you want to use. - To use a folder that has been shared from another computer on the network,
click
A share located on another computer,and then either type the network path or clickBrowseto select the shared folder. - Click
Readto grant read access to the folder (required). - Click
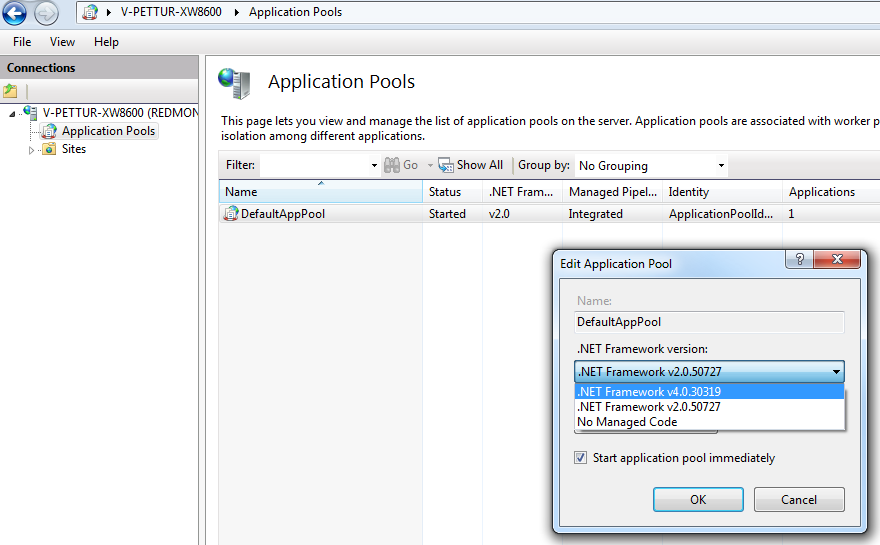
OKto accept the Web site properties. - Set .Net 4.0 as the default application pool. To do this type
inetmgrin the start menu, access the Application Pools, and change the .NET Framework version to v4.0 (unless of course it is already set correctly).
To Setup the Sharing Service🔗
- Open the command prompt using the "Run as Administrator" mode.
- Make the
$(SDKInstallDir)\Sharing Servicefolder the current directory (runcd $(SDKInstallDir)\Sharing Servicefrom the command prompt). - Run
DeploySharingService.bat. - Ensure all the pre-requisites have been installed or configured.
- Enter
ywhen prompted. - Upon successful installation, visit
http://localhost/SharingService/TileServiceSample.aspxto view the Tile Service Sample, andhttp://localhost/SharingService/CommunityServiceSample.aspxto view the Community Service Sample.
The Tile Service will serve up image and DEM tiles created using the Tile Pyramid SDK. By selecting one of the thumbnail images a tile pyramid can be viewed in Worldwide Telescope.
The Community Service displays a range of sign up files to different communities in the form of thumbnails and descriptions. If a thumbnail is selected the community will be joined and the payload file sent to the user. The account under which the Application Pool is running should have write permissions to the Community Directory to support the caching of payload Xml. The Community Service treats the following folder names as reserved: All Tours, Latest, Plates, DemPlates and Pyramid.
Including DEM data🔗
When using these samples with the sample data specified, or with any other sample data, if DEM (digital elevation model) data is not available then it can be obtained from Virtual Earth provided that the tiles created are in the same Mercator projection as Virtual Earth.
To do this edit the following entries into the WTML file to get DEM for the images:
ElevationModel="True"
DemUrl="http://ecn.t{S}.tiles.virtualearth.net/tiles/d{Q}.elv?g=1&n=z"
Running the Samples🔗
Running the BlueMarbleApp.exe sample with a single image🔗
- Download a single input Equirectangular image from
http://eoimages.gsfc.nasa.gov/ve//7100/world.topo.bathy.200401.3x5400x2700.jpg
and save it to a folder. For example, save it to
C:\SDKInputData\world.topo.bathy.200401.3x5400x2700.jpg. - Open the command prompt and navigate to the
(SDKInstallDir)\Tile Pyramid SDK\Samplesfolder. - Execute the command below:
BlueMarbleApp.exe
  /Input=C:\SDKInputData\world.topo.bathy.200401.3x5400x2700.jpg
  /Projection=Toast
  /InputBoundary=<Top Left Latitude, Top Left Longitude, Bottom Right Latitude, Bottom Right Longitude>
With the following settings:
Input— the path to an Equirectangular image in PNG or JPEG format. You can find a collection of Equirectangular images at: http://visibleearth.nasa.gov/Projection— Projection can be either Toast or Mercator. For more information please refer to: WWT Projection ReferenceInputBoundary— An optional parameter, defining the input boundary in decimal degrees.OutputDir— Optional parameter, specifying the folder for output image pyramids and newly created wtml files. If no input is supplied, image tiles are stored in the%ProgramData%\Microsoft Research\WWT SDK\Outputfolder.
Running the BlueMarbleApp.exe sample with multiple images🔗
- Download the Multipart Equirectangular images (A1, A1, A2, B1, B2, C1, C2,
D1 and D2) from NASA and save them to
a folder. (Note: these images are huge and would require a lot of
processing power to run them. If you do not have a high end server machine
at your disposal, try splitting the image downloaded in the previous step
into to smaller parts and run this sample using them). Save it to
C:\SDKInputData\. - Now build an XML file providing the location of each part and their
corresponding bounding co-ordinates (see
sample here).
Call the sample XML file
MultiPart.xml. - Open the command prompt and navigate to the
$(SDKInstallDir)\Tile Pyramid SDK\Samplesfolder, and execute the following command:
BlueMarbleApp.exe
  /Input=C:\SDKInputData\MultiPart.xml
  /Projection=Mercator
  /InputBoundary=<Top Left Latitude, Top Left Longitude, Bottom Right Latitude, Bottom Right Longitude>
Where:
Input— Points to the XML file that contains the image locations and their bounding coordinates.Projection— Projection can be either Toast or Mercator. For more information please refer to: WorldWide Telescope Projection ReferenceInputBoundary— Optional parameter, defining the input boundary in decimal degrees.OutputDir— Optional parameter, specifying the folder for output image pyramids and newly created wtml files. If no input is supplied, image tiles are stored in the%ProgramData%\Microsoft Research\WWT SDK\Outputfolder.
Running the SpecificRegionDataSet.exe sample🔗
- Download the Alaska Glacier bay data set from:
http://geopubs.wr.usgs.gov/open-file/of02-391/data/bathy.zip
(442MB), unzip it and save it to a folder. Save it to
C:\SDKInputData\. - Now navigate to the
$(SDKInstallDir)\Tile Pyramid SDK\Samplesfolder and execute the following command:
SpecificRegionDataSet.exe
  /Input=C:\SDKInputData\glaciermulti.xyz
  /Projection=Toast
Where:
Input— One XYZ data file for a specific region of the world where X is longitude, Y is latitude and Z is the value. Data should be in a regular mesh.Projection— Projection can be either Toast or Mercator. For more information please refer to: WorldWide Telescope Projection ReferenceOutputDir— Optional parameter, specifying the folder for output image pyramids and newly created wtml files. If no input is supplied, image tiles are stored in the%ProgramData%\Microsoft Research\WWT SDK\Outputfolder.
Running the WorldDataSet.exe sample🔗
- Download the ETOP01 xyz data set from NOAA (1GB file)
- Use a standard uncompressing utility to extract the XYZ file.
- Save it to a local folder. Save it to
C:\SDKInputData\. - Open the command prompt and navigate to the
(SDKInstallDir)\Tile Pyramid SDK\Samplesfolder, and execute the following command:
WorldDataSet.exe
  /Input=C:\SDKInputData\ETOPO1-Bed-g.int.xyz
  /Projection=Toast
  /ColorMap=colormap.png
  /ColorMapOrientation=Vertical
Where:
Input— One XYZ data file for entire world where X is longitude, Y is latitude and Z is the value.Projection— Projection can be either Toast or Mercator. For more information please refer to: WorldWide Telescope Projection ReferenceColorMap— Path of a color map file used. A color map is used to assign colors to various points based on their z value and the colors available in the color map (from top to bottom in the case of a vertically oriented color map). A sample file color map is included in the samples folder.ColorMapOrientation— Two values allowed horizontal or vertical. This indicates the orientation of the color map specified in the previous parameter.OutputDir— Optional parameter, specifying the folder for output image pyramids and newly created wtml files. If no input is supplied, image tiles are stored in the%ProgramData%\Microsoft Research\WWT SDK\Outputfolder.
Sample XML File for the Multi-Part Equirectangular Image🔗
<?xml version="1.0" encoding="utf-8" ?>

<Regions>
   <Row>
    <Region name="A1">
      <ImagePath>C:\SDKInputData\A1.jpg</ImagePath>
    </Region>
    <Region name="B1">
      <ImagePath>C:\SDKInputData\B1.jpg</ImagePath>
    </Region>
    <Region name="C1">
      <ImagePath>C:\SDKInputData\C1.jpg</ImagePath>
    <Region name="D1">
    </Region>
      <ImagePath>C:\SDKInputData\D1.jpg</ImagePath>
    </Region>
   </Row>
   <Row>
    <Region name="A2">
      <ImagePath>C:\SDKInputData\A2.jpg</ImagePath>
    </Region>
    <Region name="B2">
      <ImagePath>C:\SDKInputData\B2.jpg</ImagePath>
    </Region>
    <Region name="C2">
      <ImagePath>C:\SDKInputData\C2.jpg</ImagePath>
    </Region>
    <Region name="D2">
      <ImagePath>C:\SDKInputData\D2.jpg</ImagePath>
    </Region>
   </Row>
</Regions>